Sketch Challenge: #2
This week's Sketch Challenge is sponsored by My Favorite Things-Your Crafty Happy Place! Link to MFT's website is below:
 |
| My Favorite Things Website Link |
You will find the rules and inspiration from their Design team on the Sketch Challenge blog. They are offering a $50 My Favorite Things gift voucher to the winner of a random drawing of entrants. You can click on the link:
 |
| MFT Sketch Challenge Link |
MFT would love to see their products used in your creation but as always, it is not necessary in order to win. At the bottom of their blog, are directions to uploading your card or project entry. It is so neat to think that you can submit any papercraft that depicts the sketch of the week!
SKETCH #419

The process I usually do to create a card is to start with my stamps or paper. Sometimes the paper will direct me to color scheme then the mood of the card. When I flip through my stamps, I most likely will choose a 1/2 dozen sets before I finally settle to one. I have been known to change my mind at the last minute!
I like to draw out, with a pencil, a diagram, writing in paper and embellishments. I know you're dying to see my card (grin!)...
Actually, now that I see it pictured here, the front looks a little plain. I think cameras just do not do justice to the look of a card. Here's how it all came together!
I decided to use The My Favorite Things BB-Cool Cat stamp set and picked this adorable little guy! I stamped him with a block and my favorite black ink, Versafine Clair Nocturne. This ink is a hybrid and works like a pigment ink but dries much faster. I use it with clear embossing powder to heat emboss black lines. I dislike black powder! It is so messy! Just remember to powder the surface before stamping and KEEP YOUR FINGERS CLEAN!
I like using my Misti Stamp Positioner too. I can reink the stamp and stamp an image over if I don't get a good impression the first time. Even though I can see through the block, I am terrible at matching up images.
Another tool to have is a Stamper's Secret Weapon! This tool allows for clearer stamped images.
Another tool to have is a Stamper's Secret Weapon! This tool allows for clearer stamped images.
Next step was to color this little guy. I used my Copic Sketch Skin Tones marker set since they were accessible. When done, he was fussy cut.
I used several dies along the way. After I picked out the coordinating papers from my stash, I die-cut a frame which became the circle of the sketch. See how the little guy is going to sit?
The circle went in the center of the square. The square went onto the rectangle that had a matching border along the bottom. A lot of measuring went into getting the circles cut in the right place!
When I placed the kitty in the circle, he rested on a piece of acetate. I had cut a circle to fit behind the frame to make a window! All glued together, this was the front to my card. But I didn't stop there!
I made a side-folding, verticle card base out of a burnt orange 100# cardstock. I measured and deciphered then die-cut a circle in it as well. What good was a window if you couldn't see through it?
I made a boo-boo and cut the circle just a tad off. No one's perfect. So, I cut a piece of white 65# cardstock, die-cut a circle in that, and placed it on the inside of the front cover. That's a lot of circles!
But we need to cover up the back of the kitty's head.
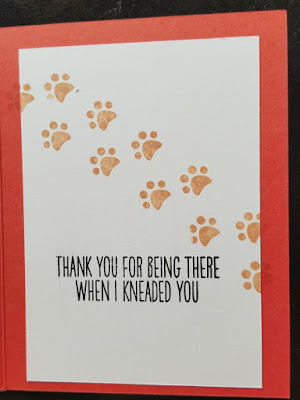
Here are the sentiment and the proof that he was there!
So, the front of the card may be a little plain but the inside turned out adorable! Here is another photo of the card on my messy work table!
(Remember I said it was up to you whether you wanted to use products from MFT? When I started putting items away, I realized that all the elements I used today were MFT products!! I will have them listed below along with a link where to purchase them should you wish.)
I hope you try today's Sketch Challenge! It can be as simple or as complicated as you want it to be! Take a picture of your creation and post it on my Facebook Page:
 |
| Lori Ellen Designs Facebook Page |
I would love to see your work and others would love the inspiration!
Thank you so much for the kind words and encouragement for my blog and my Facebook Page. My wish is to grow a community that shares with kindness and enthusiasm for papercrafting! (Watch for the opening of my Etsy shop soon!)
Remember, great things happen to those that create!
Below you will find some of the items I used to make this card and several of my favorite tools. I link to sites that carry these items at the cheapest price I could find at the time.
I AM NOT AFFILIATED WITH ANY STORES. Please do not feel obligated to purchase.
 |
| BB-Cool Cat Stamp Set |
 |
| BB-Cool Cat Die-namics |
 |
| A2 Stitched Rectangle STAX Die-namics |
 |
| Stitched Square STAX Die-namics |
 |
| Stitched Circle STAX Die-namics |
 |
| Copic Sketch Marker Set of 6-Skin Tones |
 |
| Tim Holtz Clear Design Ruler |
 |
| Artist Gum Eraser |


No comments:
Post a Comment