
Watercolor Imprints ~ Beautiful, Easy Backgrounds
This week's (the week of March 17-23, 2019) Cindy's Challenge was FUN! But let me back up.
I don't know if any of you noticed, but I skipped Cindy's Challenge last week. I just couldn't seem to get the ideas out on paper! And for a paper crafter, that is a disaster! The ideas were just not coming together and when they did, I just couldn't seem to make it look as nice on the table as it did in my head. Is that what they call 'losing your mojo'? Cindy had picked Punch Art as a Challenge and I stuck my nose up at it. So she obliged and picked a second challenge which was Copic Contour Coloring! Let's just say I tried and moved forward.
Cindy's Challenge this week is Watercolor Imprinting! Here is the video I watched to learn this technique. Watercolor Imprints by Splitcoast Stampers. Clean your desk and put down a plastic cover because we are going to play!
Watercolor Imprinting
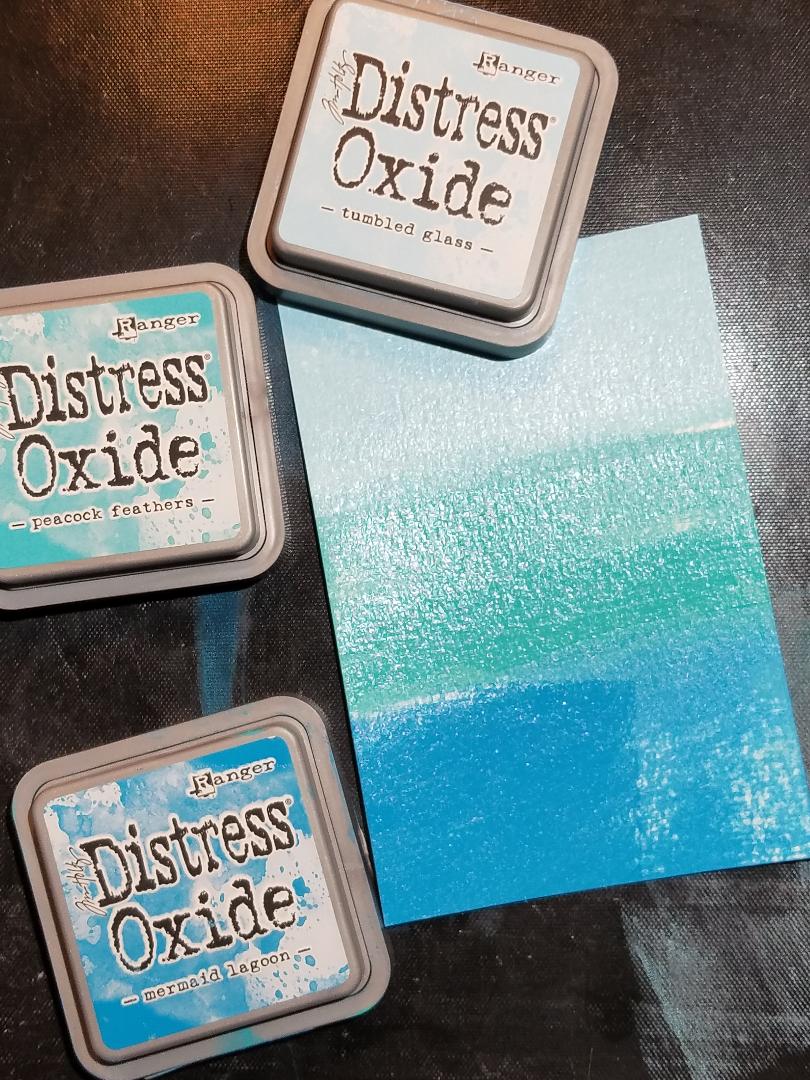
The only materials needed are watercolor paper, spray bottle of water, any water-reactive inks or paints and the rest is fun! I chose to work with my Distress Oxides. I had watched all seven weeks of Kristina Werner's Distress Oxide Ink Blending Color Combinations and thought I would pull my color combinations from her videos. Watch the first one by clicking on the picture below and then it should list the other six videos.
 |
| Kristina Werner combos week #1 |
I used the 'Direct To Paper' method to apply the ink to the watercolor paper. I swiped the mid-tone color first, Peacock Feathers.
 |
| Mid-tone color: Peacock Feathers Distress Oxide |
TIP: I suggest wearing plastic gloves. I had so much fun getting inky though...and believe me, you WILL!
I applied the lightest hue next, Tumbled Glass Distress Oxide.

Blueprint Sketch Distress Oxide was the final color applied directly to the paper.
 |
| Ink applied. |
Taking a spray bottle of clear water, I liberally sprayed the paper panel until the colors began to blend.
TIP: When a fair amount of water is applied to watercolor paper, it likes to curl. I heard if you sprayed the back once, it will encourage your paper to lay flat. (Make sure you are saturating your paper in a place where you will not be moving it again!)
I chose Hero Arts Swirl stencil for this piece. Once the card was soaked, water still sitting puddled on the paper, I placed the stencil atop, centering the colors with the design. I was excited to see how it would turn out!
 |
| Panel with Distress Oxides, Swirl stencil and a spray bottle with water |
 |
| Made sure stencil made contact, no air pockets |
I placed my acrylic blocks around it to make sure it would not bow while drying. The hardest part of the whole technique came next. I HAD TO WAIT for it to dry. So, I did this later in the day and let them sit overnight.
TIP: Actually, this one I dried with a heat gun after a couple hours. I wanted to see how it was going to look! I started by heat drying it flat with the stencil still on it. Then I slowly removed the stencil and finished drying it. (I have a heat-resistant surface on my desk.) Because I tried it this way, the panel curled and bowed in the middle.

The next morning was exciting as I did the reveal on all the panels I had created!!

Using the Watercolor Imprints in cards!
Distress Oxides Scattered Straw, Worn Lipstick and Festive Berries and the Tim Holtz Layering Stencil Floral were used on this watercolor panel.
 |
| Floral Layering stencil |
This particular panel used Distress Oxides Dusty Concord, Faded Jeans, and Cracked Pistachio with a random dragonfly stencil I found in my stash. I cut the center of a piece of white cardstock with a My Favorite Things Inside/Out Stitched Rectangle die to create a frame. I raised it with some foam tape and left the background flat against the card base. I stamped, embossed and raised the sentiment strip which came from the Altenew Under the Cherry Blossom Tree Stamp Set!
 |
| dragonfly stencil |
TIP: Because Distress Oxides have pigment ink in them, they are slower to dry. This creates an opportunity to use clear embossing powder upon a stamped sentiment that matches your project! Above, I used the three colors on the stamp 'with love' so it would match the imprinted panel! Embossing your sentiment jazzes up the card!
And here is the sample I created just for this blog! I used the My Favorite Things Mermaizing Stamp Set!
 |
| Swirls of water imprint! |
There are a couple of panels that I haven't used yet for cards...
 |
| l-r: Butterfly Stencil, Swirl stencil |
The left-hand panel was inked with Distress Oxides Dried Marigold, Ripe Persimmon and then Aged Mahogany and a Butterfly Stencil from Clear Scraps was added. The panel on the right was inked with Distress Oxides Chipped Sapphire, Pine Needles, and Twisted Citron and the Swirl stencil from Hero Arts was used.
Watch for more imprinted card backgrounds!
The next evening I covered my desk with another plastic garbage bag and sprayed some more inky watercolor panels and this time I used background stamps for the imprints!
I hope you find time this weekend to play in the ink! Just about any stencil would work for this technique. Post a photo of your work on my Facebook Page below!
I am excited to announce that my Etsy shop is up and running, LoriEllenDesigns! I'm still new in the world of Etsy but it is an adventure that I am embracing! Most of the cards that I show in my blog, as well as others I haven't written about, are displayed there. Take a look and let me know your thoughts!
I hope you find time this weekend to play in the ink! Just about any stencil would work for this technique. Post a photo of your work on my Facebook Page below!
 |
| Lori Ellen Designs Facebook Page |
I am excited to announce that my Etsy shop is up and running, LoriEllenDesigns! I'm still new in the world of Etsy but it is an adventure that I am embracing! Most of the cards that I show in my blog, as well as others I haven't written about, are displayed there. Take a look and let me know your thoughts!
I belong to several Facebook groups as I'm sure many of you are. I do participate in Card Swaps and have posted a few of the Swap Cards in my blog and on Facebook. If there is a technique or design question that you have or would just like to know where I purchased something, please, drop me a line. My email is loriellendesigns@gmail.com. Or you can PM me on Facebook or leave comments below a photo or in my blog.
I sincerely THANK YOU for all the kind words of my artwork. But nothing makes me happier than when a fellow crafter creates with me! It is YOU that inspires me!
Artistically and Lovingly Yours,


loriellendesigns@gmail.com
Below I have a list of some of the items I used in making this card. I added some of my favorite tools also. Clicking on the picture will take you to more information.
I AM NOT AFFILIATED WITH ANY SHOPS so I am not selling items. Feel free to comment or contact me with any questions!

 |
| Hero Arts Swirl Stencil |
 |
| Inside/Out Rectangle Dies |


I love your designs so much. I am attempting this... will let you know if and when i succeed. Hugs , Sandi
ReplyDelete