
Diagonal Card ~ Welcome Baby
I was asked to create a diagonal card. Not really sure what one was, I turned to Pinterest! Sometimes it's just that simple!
And it is! Here is the pattern for the Diagonal Card. It is an 8 1/2"x 11" piece of cardstock, scored and folded into quarters. This creates four (4) equal rectangles of standard card size, 4 1/4"x 5 1/2" (A2).
Placing one corner on the cutting edge of your trimmer and pairing it with the opposite corner, cut diagonally, from corner to corner. It should look something like this:

You should have two cards. Two for the price of one! Now to decorate. The flaps are not as difficult as it would lead you to believe.
 |
| Cardstock folded into quarters then cut diagonally. |
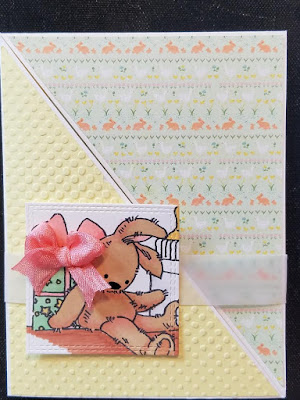
I paired paper from the 6"x 6" Authentique Beginnings collection with yellow cardstock embossed with the Cuttlebug Ben-day Dots embossing folder for my card front.
To leave a 1/16" border around the edge, cut a
4 1/8"x 5 3/8" piece of pattern paper. Place it diagonally into your trimmer and cut from corner to corner creating two (2) triangles. (TIP: If there is a distinct pattern to the design, make sure you are choosing the correct corner cuts and that the paper is facing up. I learned the hard way after cutting up several pieces of paper into triangles!)
Trim the inside of the triangle as well by just taking off a scant 1/16" on the long side.
 |
| Trim 1/16" off the longest side of the triangle. |
A belly band will be placed around the middle of this card to hold it closed so the corners of the papers must be securely attached. I run my ATG tape right as close to the edge of the paper as I can get and right off the tip of the triangle. The tape that hangs over can be pushed back onto itself but I found this was too bulky and the corner was raised from the extra tape. (TIP: Once your paper is in place, gently rub with your finger or a gum eraser, like Magic Rub eraser, along the edge and the excess tape will come right off!)
 |
| Excess tape from ATG gun or tape runner |
I colored two images from Lily of the Valley's Digi Shop on Etsy.com. Lisa's digital images are just adorable and fun to color! I used Copic Markers and several other alcohol markers to color in these little guys. They were cut out with stitched dies and placed onto a 3/4" strip of vellum for a belly band.
 |
| Toy Giraffe and Toy Rabbit digital stamps |
Adding some dimension to the image, I colored a piece of Hug Snug Seam Binding the same color as the bow with my Copic R22 marker and made a bow. This was attached to the image on both cards. Black gel pen was added to the eyes and nose and Wink of Stella was used to glitter up the gift.


Artistically and Lovingly Yours,

Since there was no sentiment on the outside, I felt it necessary to decorate the inside more than usual. The sentiments were stamped with Abandoned Coral Distress Oxide ink and heat embossed with Clear Embossing Powder by Ranger.


I lost my Mojo this weekend and have ideas floating around but can't seem to put them into anything tangible. Pinterest is an excellent place to get inspired, as well as Instagram and Youtube. Give those artists and crafters you turn to for inspiration a little extra LOVE this month! It's National Craft Month and I'm positive they would love to hear from you!
I would love to see your Diagonal cards or the digis you chose to color! Post them on my Facebook Page to share your inspiration with others!
 |
| Lori Ellen Designs Facebook Page (LIKE it to get notified of postings and updates!) |
Artistically and Lovingly Yours,


Lori Ellen Designs
loriellendesigns@gmail.com
Below I have a list of some of the items I used in making this card. I added some of my favorite tools also. Clicking on the picture will take you to more information.
I AM NOT AFFILIATED WITH ANY SHOPS so I am not selling items. Feel free to comment or contact me with any questions!
 |
| Authentique Beginnings Bundle Pad 6x6 |
 |
| Magic Rub Gum eraser |
 |
| Distress Oxide ink |
So glad I came from Midwest Stampers to actually see the card. I didn't realize how it opened. Now I am off to try one/two and make a sample for my "technique book". Thank-you so much.
ReplyDeletePhyllis610, I am so glad you were able to come and play!! I would love to take a peek into your technique book! Thank you so much for coming by!
DeleteGood website! I truly love how it is easy on my eyes it is. I am wondering how I might be notified whenever a new post has been made. I have subscribed to your RSS which may do the trick? Have a great day! wholesale kids clothing suppliers
ReplyDelete