Saturday, March 23, 2019

WATERCOLOR IMPRINTS

Watercolor Imprints ~ Beautiful, Easy Backgrounds

This week's (the week of March 17-23, 2019) Cindy's Challenge was FUN! But let me back up. 

I don't know if any of you noticed, but I skipped Cindy's Challenge last week. I just couldn't seem to get the ideas out on paper! And for a paper crafter, that is a disaster! The ideas were just not coming together and when they did, I just couldn't seem to make it look as nice on the table as it did in my head. Is that what they call 'losing your mojo'? Cindy had picked Punch Art as a Challenge and I stuck my nose up at it. So she obliged and picked a second challenge which was Copic Contour Coloring! Let's just say I tried and moved forward.

Cindy's Challenge this week is Watercolor Imprinting! Here is the video I watched to learn this technique. Watercolor Imprints by Splitcoast Stampers. Clean your desk and put down a plastic cover because we are going to play!

Watercolor Imprinting

The only materials needed are watercolor paper, spray bottle of water, any water-reactive inks or paints and the rest is fun! I chose to work with my Distress Oxides. I had watched all seven weeks of Kristina Werner's Distress Oxide Ink Blending Color Combinations and thought I would pull my color combinations from her videos. Watch the first one by clicking on the picture below and then it should list the other six videos.

Kristina Werner combos week #1

I used the 'Direct To Paper' method to apply the ink to the watercolor paper. I swiped the mid-tone color first, Peacock Feathers.

Mid-tone color: Peacock Feathers Distress Oxide

TIP: I suggest wearing plastic gloves. I had so much fun getting inky though...and believe me, you WILL!

I applied the lightest hue next, Tumbled Glass Distress Oxide.


Blueprint Sketch Distress Oxide was the final color applied directly to the paper.
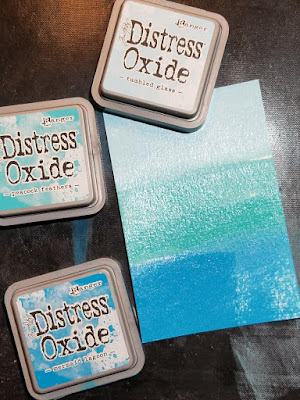

Ink applied.

Taking a spray bottle of clear water, I liberally sprayed the paper panel until the colors began to blend.

TIP: When a fair amount of water is applied to watercolor paper, it likes to curl. I heard if you sprayed the back once, it will encourage your paper to lay flat. (Make sure you are saturating your paper in a place where you will not be moving it again!)

I chose Hero Arts Swirl stencil for this piece. Once the card was soaked, water still sitting puddled on the paper, I placed the stencil atop, centering the colors with the design. I was excited to see how it would turn out!


Panel with Distress Oxides,
 Swirl stencil and a spray bottle with water


Made sure stencil made contact, no air pockets

I placed my acrylic blocks around it to make sure it would not bow while drying. The hardest part of the whole technique came next. I HAD TO WAIT for it to dry. So, I did this later in the day and let them sit overnight.

TIP: Actually, this one I dried with a heat gun after a couple hours. I wanted to see how it was going to look! I started by heat drying it flat with the stencil still on it. Then I slowly removed the stencil and finished drying it. (I have a heat-resistant surface on my desk.) Because I tried it this way, the panel curled and bowed in the middle.


The next morning was exciting as I did the reveal on all the panels I had created!!


Using the Watercolor Imprints in cards!


Distress Oxides Scattered Straw, Worn Lipstick and Festive Berries and the Tim Holtz Layering Stencil Floral were used on this watercolor panel.


Floral Layering stencil

This particular panel used Distress Oxides Dusty Concord, Faded Jeans, and Cracked Pistachio with a random dragonfly stencil I found in my stash. I cut the center of a piece of white cardstock with a My Favorite Things Inside/Out Stitched Rectangle die to create a frame. I raised it with some foam tape and left the background flat against the card base. I stamped, embossed and raised the sentiment strip which came from the Altenew Under the Cherry Blossom Tree Stamp Set!


dragonfly stencil


TIP: Because Distress Oxides have pigment ink in them, they are slower to dry. This creates an opportunity to use clear embossing powder upon a stamped sentiment that matches your project! Above, I used the three colors on the stamp 'with love' so it would match the imprinted panel! Embossing your sentiment jazzes up the card!

And here is the sample I created just for this blog! I used the My Favorite Things Mermaizing Stamp Set!

Swirls of water imprint!

There are a couple of panels that I haven't used yet for cards...

l-r: Butterfly Stencil, Swirl stencil

The left-hand panel was inked with Distress Oxides Dried Marigold, Ripe Persimmon and then Aged Mahogany and a Butterfly Stencil from Clear Scraps was added. The panel on the right was inked with Distress Oxides Chipped Sapphire, Pine Needles, and Twisted Citron and the Swirl stencil from Hero Arts was used.

Watch for more imprinted card backgrounds!

The next evening I covered my desk with another plastic garbage bag and sprayed some more inky watercolor panels and this time I used background stamps for the imprints!

I hope you find time this weekend to play in the ink! Just about any stencil would work for this technique. Post a photo of your work on my Facebook Page below!

Lori Ellen Designs Facebook Page

I am excited to announce that my Etsy shop is up and running, LoriEllenDesigns! I'm still new in the world of Etsy but it is an adventure that I am embracing! Most of the cards that I show in my blog, as well as others I haven't written about, are displayed there. Take a look and let me know your thoughts!

I belong to several Facebook groups as I'm sure many of you are. I do participate in Card Swaps and have posted a few of the Swap Cards in my blog and on Facebook. If there is a technique or design question that you have or would just like to know where I purchased something, please, drop me a line. My email is loriellendesigns@gmail.com. Or you can PM me on Facebook or leave comments below a photo or in my blog. 

I sincerely THANK YOU for all the kind words of my artwork. But nothing makes me happier than when a fellow crafter creates with me! It is YOU that inspires me!

Artistically and Lovingly Yours,


loriellendesigns@gmail.com

Below I have a list of some of the items I used in making this card. I added some of my favorite tools also. Clicking on the picture will take you to more information.

I AM NOT AFFILIATED WITH ANY SHOPS so I am not selling items. Feel free to comment or contact me with any questions!


Hero Arts Swirl Stencil


Inside/Out Rectangle Dies

Tuesday, March 19, 2019

SSS SKETCHED FLOWERS: THREE CARDS, ONE STAMP

Three Papers, Three Mediums, Three Cards...One Stamp

Perhaps it's the smell of raindrops in the air and the snow beginning to melt which makes me anticipate spring, summer, warmth and my gardens! I have been obsessed with Simon Says Stamp's Sketched Flowers these past few weeks. I wanted to dig into my stash and find a stamp set that was versatile enough to use all year round. Besides the easy-to-color design, I love how the Sketched Flowers are larger than A2 (4 1/4"x 5 1/2") size and can be placed 'off the page'. 

Card Number One

For the first card, I cut Strathmore's 100# Bristol Smooth Cardstock into 4 1/4"x 5 1/2". I used the largest floral stamp in the set and placed the paper and stamp into my regular-size Misti stamping tool. I made note of where I placed the paper so that I could stamp all three card fronts identically. I used Memento Tuxedo Black ink to stamp the image.

Image stamped with Memento Ink

TIP: To clean my stamp in between inks, I use the Lawn Fawn Stamp Shammy! Just like the shammy that Dad used so no water spots showed, this shammy just needs water to wipe your stamp clean! Just rinse it and lay flat to dry when you are done for the day. Every few days, I let my shammy soak in soapy water overnight to get deep inkiness out.

To color this card front, I used Copic Sketch Markers. They blend so well on the Bristol cardstock! And the Memento Ink does not bleed when used with Copic Markers. To finish it off, I used a black gel pel in the centers and added some sequins from Neat & Tangled's Festive Fall Mix. 


Image colored with Copic Markers

Card Number Two

The second card front I cut Neenah 100# Desert Storm Cardstock into 4 1/4"x 5 1/2". After I placed it into my Misti, I used the EK Success Powder Tool to remove static from the surface of the cardstock. This helps prevent stray embossing powder from sticking where I don't wish it to.

The image was then stamped with Versamark ink and a fine white detail embossing powder was used and heat set.

Image stamped with Versamark
and white heat embossed

This card front was then colored with Prismacolor Colored Pencils. Black Soot Distress Ink was squished (nice technical term!) onto the craft mat, water added and then splattered onto the cardstock. 

image colored with colored pencils

Card Number Three

This card front I used Simon Says Stamp's Barely Beige Dye Ink (you could use Antique Linen or Hickory Smoke Distress Ink as well) to stamp the same image onto a 4 1/4"x 5 1/2" piece of Canson XL 140# Watercolor paper. I chose to use the smooth side. 

I stamped the image several times to get a good impression. The watercolor paper has a deeper texture and you might want to make sure you have a clear image for the next coloring medium.

a very faint outline of the image

This third image was then colored using the 'no line' watercolor technique. Since I had loaned my Zig Clean Clear Brush watercolor markers to my bestie, Cindy, I used Tim Holtz's Distress Inks in the mini cubes for my watercolors. 

TIP: Cut a piece of cardstock to fit inside a package from an empty stamp or die set. Slide it in and seal. This makes the perfect palette to squish (there's that word again) your ink onto.

Use a regular paint brush or watercolor brush to pick up the ink and use as watercolors! Use the stamped image as a guide. When I was finished, I used the darkest color and splattered paint onto the card front.

mini ink cubes used as watercolors

Finishing Touches

On card fronts Two and Three, I sprayed Sheer Shimmer Spritz. This fine mist gives the sparkle of glitter paper!! (I tried to photo it. You just HAVE to try this stuff especially if you are like me. I DO NOT LIKE glitter everywhere but I like the look!

adding Sheer Shimmer Spritz

Just can't get the full effect!

I mounted the two white card fronts to Neenah Desert Storm card bases and the dark card front to a 110# white cardstock card base. All three had the same sentiment stamped on the outside with Versafine Clair Nocturne ink. The insides were stamped with a single flower from the stamp set in Barely Beige ink and then "smile" was added in black.


These colors are my favorite! They look very much like Autumn which gives me yet another idea! How about the same stamp set colored for all four seasons?!


I hope you stretch the use of your favorite stamp set and try using different papers or mediums to color with! I LOVE seeing your work!! It inspires others to try something new too! You can find me here on my blog, on Lori Ellen Designs Facebook Page, on Pinterest and you'll find these cards in my Etsy shop...

Lori Ellen Designs Etsy Shop


Artistically and Lovingly Yours,


loriellendesigns@gmail.com

Below I have a list of some of the items I used in making this card. I added some of my favorite tools also. Clicking on the picture will take you to more information.

I AM NOT AFFILIATED WITH ANY SHOPS so I am not selling items. Feel free to comment or contact me with any questions!


SSS Sketched Flowers


Lawn Fawn Stamp Shammy

Neenah Desert Storm Cardstock


EK Success Powder Tool


Wednesday, March 13, 2019

DIAGONAL CARD ~ WELCOME BABY

Diagonal Card ~ Welcome Baby

I was asked to create a diagonal card.  Not really sure what one was, I turned to Pinterest! Sometimes it's just that simple!

And it is! Here is the pattern for the Diagonal Card. It is an 8 1/2"x 11" piece of cardstock, scored and folded into quarters. This creates four (4) equal rectangles of standard card size, 4 1/4"x 5 1/2" (A2). 

Placing one corner on the cutting edge of your trimmer and pairing it with the opposite corner, cut diagonally, from corner to corner. It should look something like this:


You should have two cards. Two for the price of one! Now to decorate. The flaps are not as difficult as it would lead you to believe. 

Cardstock folded into quarters then cut diagonally.


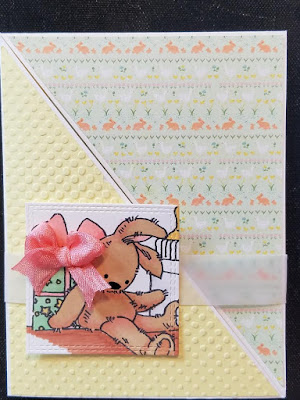
I paired paper from the 6"x 6" Authentique Beginnings collection with yellow cardstock embossed with the Cuttlebug Ben-day Dots embossing folder for my card front.

To leave a 1/16" border around the edge, cut a 
4 1/8"x 5 3/8" piece of pattern paper. Place it diagonally into your trimmer and cut from corner to corner creating two (2) triangles. (TIP: If there is a distinct pattern to the design, make sure you are choosing the correct corner cuts and that the paper is facing up. I learned the hard way after cutting up several pieces of paper into triangles!)


Trim the inside of the triangle as well by just taking off a scant 1/16" on the long side.

Trim 1/16" off the longest side of the triangle.

A belly band will be placed around the middle of this card to hold it closed so the corners of the papers must be securely attached. I run my ATG tape right as close to the edge of the paper as I can get and right off the tip of the triangle. The tape that hangs over can be pushed back onto itself but I found this was too bulky and the corner was raised from the extra tape. (TIP: Once your paper is in place, gently rub with your finger or a gum eraser, like Magic Rub eraser, along the edge and the excess tape will come right off!)

Excess tape from ATG gun or tape runner

I colored two images from Lily of the Valley's Digi Shop on Etsy.com. Lisa's digital images are just adorable and fun to color! I used Copic Markers and several other alcohol markers to color in these little guys. They were cut out with stitched dies and placed onto a 3/4" strip of vellum for a belly band. 

Toy Giraffe and Toy Rabbit digital stamps


Adding some dimension to the image, I colored a piece of Hug Snug Seam Binding the same color as the bow with my Copic R22 marker and made a bow. This was attached to the image on both cards. Black gel pen was added to the eyes and nose and Wink of Stella was used to glitter up the gift.


Since there was no sentiment on the outside, I felt it necessary to decorate the inside more than usual. The sentiments were stamped with Abandoned Coral Distress Oxide ink and heat embossed with Clear Embossing Powder by Ranger. 


I lost my Mojo this weekend and have ideas floating around but can't seem to put them into anything tangible. Pinterest is an excellent place to get inspired, as well as Instagram and Youtube. Give those artists and crafters you turn to for inspiration a little extra LOVE this month! It's National Craft Month and I'm positive they would love to hear from you! 

I would love to see your Diagonal cards or the digis you chose to color! Post them on my Facebook Page to share your inspiration with others! 


Lori Ellen Designs Facebook Page
(LIKE it to get notified of postings and updates!)

Artistically and Lovingly Yours,


Lori Ellen Designs
loriellendesigns@gmail.com


Below I have a list of some of the items I used in making this card. I added some of my favorite tools also. Clicking on the picture will take you to more information.

I AM NOT AFFILIATED WITH ANY SHOPS so I am not selling items. Feel free to comment or contact me with any questions!

Authentique Beginnings Bundle Pad 6x6

Magic Rub Gum eraser

Distress Oxide ink